main() blog

プログラムやゲーム、旅、愛する家族について綴っていきます。

Xcodeで実行時の作業ディレクトリの変更方法

Xcodeでデバッガで実行した際のファイルの読み込みの作業ディレクトリは以下の方法で変更できる。

1.Xcodeのメニューバーの [Product] → [Scheme] → [Edit Scheme] を開く。

f:id:takezoh_1127:20190830000913p:plain

2.[Run] の [Options] を選択。
3.その中のWorking Directory の Use custom working directory: にチェックを入れる。
4.その下の項目にデータを読み込ませるパスを指定する。
 例えばプロジェクト直下から読みたい場合は、環境変数の $(SRCROOT) を指定することで読み込むことができる。

f:id:takezoh_1127:20190830000930p:plain

*.xcodeprojのあるディレクトリで以下のコマンドを実行すると環境変数を確認することができる。

xcodebuild -showBuildSettings

XcodeでARCの有効/無効を設定する方法

Xcodeはデフォルトでプロジェクト全体の設定でARCが有効になっている。

ファイル単位でARCの設定を行う

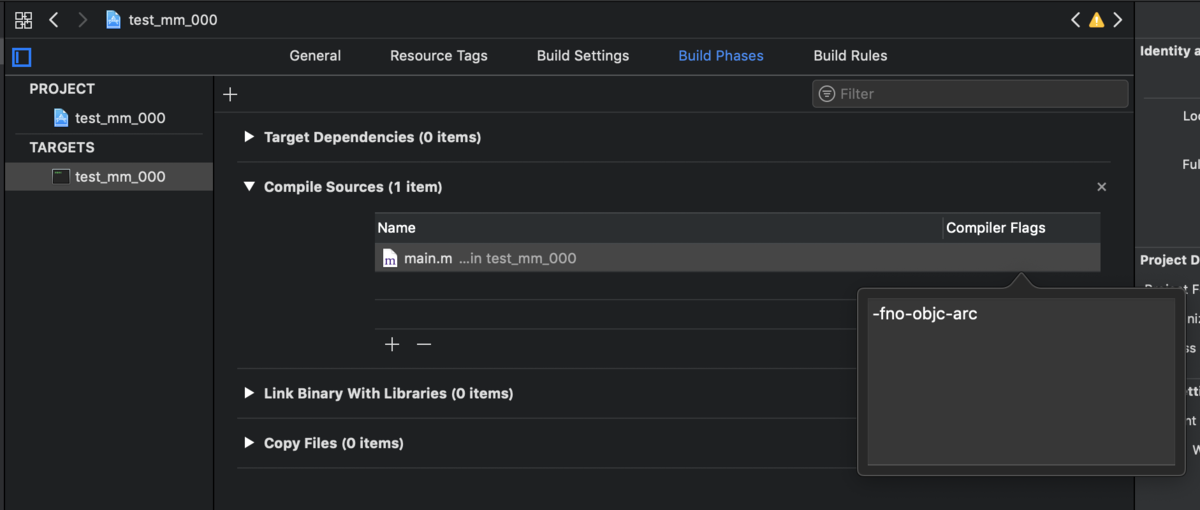
プロジェクト内で特定のファイルのみARCの設定を変更したい場合、以下の設定を行う。

1.各ファイルの [Build Phase] → [Compile Source] を開く
2.ARCを無効にしたいファイルを選択してエンターキーもしくはダブルクリックする
3.入力欄が表示されるので無効にする場合は -fno-objc-arc と入力する
(※有効にする場合は -fobjc-arc と入力する)

f:id:takezoh_1127:20190829233002p:plain

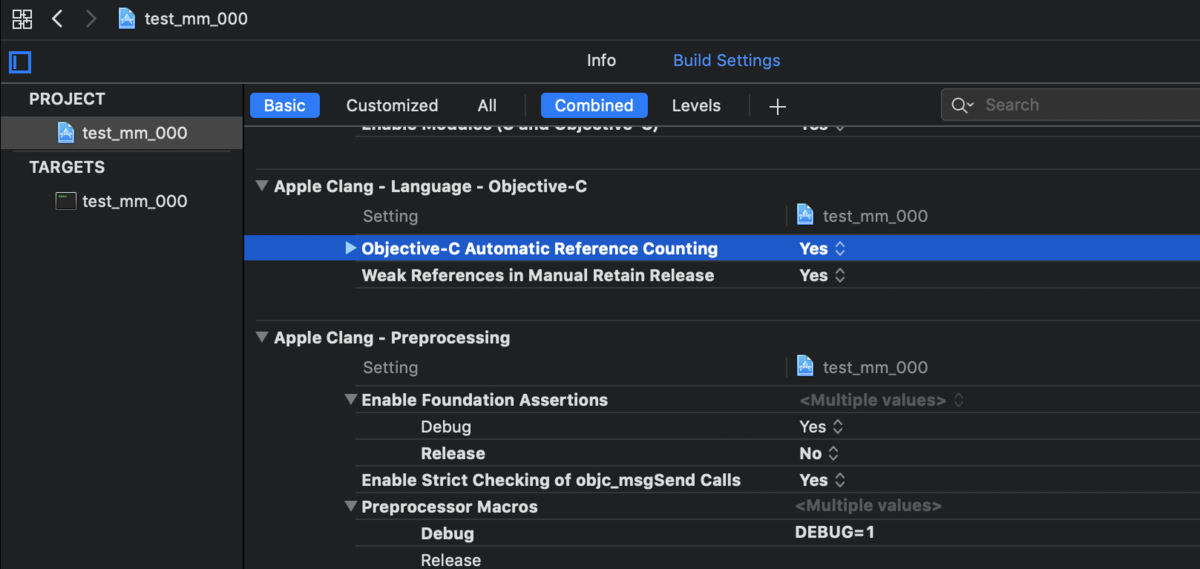
プロジェクト全体でARCの設定を行う

プロジェクト全体のARCの設定は [Build Setting] → [Apple Clang - Language - Objective-C] の
"Objective-C Automatic Reference Counting"で変更できる。

f:id:takezoh_1127:20190829233045p:plain

【Metal】mtlppをビルドしてみる

mtlppとはAppleのOSで動作するオーバーヘッドの小さいローレベル(low level)のグラフィックスAPIのMetalのC++ラッパーである。

github.com

MetalはObjective-CかSwiftのAPIは用意されているが、C++でのAPIは用意されていない。 mtlppはObjective-Cで実装し、C++から呼び出せる様にしている。

UnrealEngineでも使用されている模様...

とりあえずビルドしてみる。

GitHubからCloneもしくはダウンロードする。

今回はダウンドードした環境でビルドしてみる。 ターミナルから展開した環境にディレクトリに移動する。

scripts/以下に移動して以下のシェルスクリプトを実行する。

$ ./build_osx.sh

ビルドが開始される。

++ dirname ./build_osx.sh
+ cd .
+ [[ '' == \a\r\m ]]
+ build_mac 10.9
+ local ver=10.9
+ local output=../.build/macos_10.9
+ local 'objcflags=-std=c++11 -x objective-c++ -mmacosx-version-min=10.9'
+ local 'cppflags=-std=c++11 -mmacosx-version-min=10.9'
+ local 'ldflags=-framework Metal -framework MetalKit -framework Cocoa -framework CoreFoundation -fobjc-link-runtime'
+ rm -Rf ../.build/macos_10.9
+ mkdir -p ../.build/macos_10.9
+ clang++ -std=c++11 -x objective-c++ -mmacosx-version-min=10.9 -c ../mtlpp.mm -o ../.build/macos_10.9/mtlpp.o
+ clang++ -std=c++11 -x objective-c++ -mmacosx-version-min=10.9 -c ../examples/window_macos.mm -o ../.build/macos_10.9/window.o
+ clang++ -std=c++11 -mmacosx-version-min=10.9 -framework Metal -framework MetalKit -framework Cocoa -framework CoreFoundation -fobjc-link-runtime ../examples/00_init.cpp ../.build/macos_10.9/mtlpp.o -o ../.build/macos_10.9/00_init
+ clang++ -std=c++11 -mmacosx-version-min=10.9 -framework Metal -framework MetalKit -framework Cocoa -framework CoreFoundation -fobjc-link-runtime ../examples/01_clear.cpp ../.build/macos_10.9/mtlpp.o -o ../.build/macos_10.9/01_clear
+ clang++ -std=c++11 -mmacosx-version-min=10.9 -framework Metal -framework MetalKit -framework Cocoa -framework CoreFoundation -fobjc-link-runtime ../examples/02_triangle.cpp ../.build/macos_10.9/mtlpp.o -o ../.build/macos_10.9/02_triangle
+ clang++ -std=c++11 -mmacosx-version-min=10.9 -framework Metal -framework MetalKit -framework Cocoa -framework CoreFoundation -fobjc-link-runtime ../examples/03_compute.cpp ../.build/macos_10.9/mtlpp.o -o ../.build/macos_10.9/03_compute
+ clang++ -std=c++11 -mmacosx-version-min=10.9 -framework Metal -framework MetalKit -framework Cocoa -framework CoreFoundation -fobjc-link-runtime ../examples/04_window.cpp ../.build/macos_10.9/mtlpp.o ../.build/macos_10.9/window.o -o ../.build/macos_10.9/04_window

    :
    :

+ build_mac 10.12
+ local ver=10.12
+ local output=../.build/macos_10.12
+ local 'objcflags=-std=c++11 -x objective-c++ -mmacosx-version-min=10.12'
+ local 'cppflags=-std=c++11 -mmacosx-version-min=10.12'
+ local 'ldflags=-framework Metal -framework MetalKit -framework Cocoa -framework CoreFoundation -fobjc-link-runtime'
+ rm -Rf ../.build/macos_10.12
+ mkdir -p ../.build/macos_10.12
+ clang++ -std=c++11 -x objective-c++ -mmacosx-version-min=10.12 -c ../mtlpp.mm -o ../.build/macos_10.12/mtlpp.o
+ clang++ -std=c++11 -x objective-c++ -mmacosx-version-min=10.12 -c ../examples/window_macos.mm -o ../.build/macos_10.12/window.o
+ clang++ -std=c++11 -mmacosx-version-min=10.12 -framework Metal -framework MetalKit -framework Cocoa -framework CoreFoundation -fobjc-link-runtime ../examples/00_init.cpp ../.build/macos_10.12/mtlpp.o -o ../.build/macos_10.12/00_init
+ clang++ -std=c++11 -mmacosx-version-min=10.12 -framework Metal -framework MetalKit -framework Cocoa -framework CoreFoundation -fobjc-link-runtime ../examples/01_clear.cpp ../.build/macos_10.12/mtlpp.o -o ../.build/macos_10.12/01_clear
+ clang++ -std=c++11 -mmacosx-version-min=10.12 -framework Metal -framework MetalKit -framework Cocoa -framework CoreFoundation -fobjc-link-runtime ../examples/02_triangle.cpp ../.build/macos_10.12/mtlpp.o -o ../.build/macos_10.12/02_triangle
+ clang++ -std=c++11 -mmacosx-version-min=10.12 -framework Metal -framework MetalKit -framework Cocoa -framework CoreFoundation -fobjc-link-runtime ../examples/03_compute.cpp ../.build/macos_10.12/mtlpp.o -o ../.build/macos_10.12/03_compute
+ clang++ -std=c++11 -mmacosx-version-min=10.12 -framework Metal -framework MetalKit -framework Cocoa -framework CoreFoundation -fobjc-link-runtime ../examples/04_window.cpp ../.build/macos_10.12/mtlpp.o ../.build/macos_10.12/window.o -o ../.build/macos_10.12/04_window

ビルドされた実行ファイルは .build/以下に出力されている。

drwxr-xr-x  12 xxxxx  staff     384  3 25 18:57 .
drwxr-xr-x   8 xxxxx  staff     256  9 24  2018 ..
drwxr-xr-x   6 xxxxx  staff     192  3 25 18:59 .build
-rwxr-xr-x@  1 xxxxx  staff      17  1 23  2018 .gitignore
-rwxr-xr-x@  1 xxxxx  staff     418  1 23  2018 .travis.yml
-rwxr-xr-x@  1 xxxxx  staff    1078  1 23  2018 LICENSE
-rwxr-xr-x@  1 xxxxx  staff    1624  1 23  2018 README.md
drwxr-xr-x  10 xxxxx  staff     320  3 25 18:57 examples
-rwxr-xr-x@  1 xxxxx  staff   96835  1 23  2018 mtlpp.hpp
-rwxr-xr-x@  1 xxxxx  staff  164269  1 23  2018 mtlpp.mm
drwxr-xr-x   5 xxxxx  staff     160  3 25 18:57 scripts
drwxr-xr-x  56 xxxxx  staff    1792  3 25 18:57 src

OSのバージョン毎にビルドされている。

drwxr-xr-x   6 xxxxx  staff  192  3 25 18:59 .
drwxr-xr-x  12 xxxxx  staff  384  3 25 18:57 ..
drwxr-xr-x   9 xxxxx  staff  288  3 25 18:59 macos_10.10
drwxr-xr-x   9 xxxxx  staff  288  3 25 18:59 macos_10.11
drwxr-xr-x   9 xxxxx  staff  288  3 25 18:59 macos_10.12
drwxr-xr-x   9 xxxxx  staff  288  3 25 18:59 macos_10.9

$ cd ./macos_10.12

drwxr-xr-x  9 xxxxx  staff     288  3 25 18:59 .
drwxr-xr-x  6 xxxxx  staff     192  3 25 18:59 ..
-rwxr-xr-x  1 xxxxx  staff  236408  3 25 18:59 00_init
-rwxr-xr-x  1 xxxxx  staff  241120  3 25 18:59 01_clear
-rwxr-xr-x  1 xxxxx  staff  241656  3 25 18:59 02_triangle
-rwxr-xr-x  1 xxxxx  staff  240696  3 25 18:59 03_compute
-rwxr-xr-x  1 xxxxx  staff  250108  3 25 18:59 04_window
-rw-r--r--  1 xxxxx  staff  296820  3 25 18:59 mtlpp.o
-rw-r--r--  1 xxxxx  staff   16712  3 25 18:59 window.o

04_windowを実行してみる。

$ ./04_window

以下の画面が表示されることを確認。

f:id:takezoh_1127:20190325193243p:plain

以上がmtlppのビルドと実行確認の方法。

【Mac】Node.jsのインストール方法

MacにNode.jsをインストールする方法についてです。
f:id:takezoh_1127:20190124231337p:plain

nodejsのインストール

公式サイトからダウンロードしてインストールする方法もありますが、
今回はnodebrewというのがあるのでそちらでのインストール方法を紹介します。

・公式

nodejs.org

nodeがインストールされているか確認してみます。

$ node -v
-bash: node: command not found

インストールされていないようなのでnodebrewを使ってインストールしていきます。

nodebrewのインストール

Homebrewを使用してインストールします。
Homebrewについてはこちらも参考にしてください。

www.main-function.com

以下のコマンドでnodebrewをインストールします。

$ brew install nodebrew

$ brew install nodebrew
==> Downloading https://github.com/hokaccha/nodebrew/archive/v1.0.1.tar.gz
==> Downloading from https://codeload.github.com/hokaccha/nodebrew/tar.gz/v1.0.1
######################################################################## 100.0%
==> Caveats
You need to manually run setup_dirs to create directories required by nodebrew:
  /usr/local/opt/nodebrew/bin/nodebrew setup_dirs

Add path:
  export PATH=$HOME/.nodebrew/current/bin:$PATH

To use Homebrew's directories rather than ~/.nodebrew add to your profile:
  export NODEBREW_ROOT=/usr/local/var/nodebrew

Bash completion has been installed to:
  /usr/local/etc/bash_completion.d

zsh completions have been installed to:
  /usr/local/share/zsh/site-functions
==> Summary
🍺  /usr/local/Cellar/nodebrew/1.0.1: 8 files, 38.6KB, built in 6 seconds

とりあえずインストールされたようです。
ちなみに自分はnodebrewインストール時に以下の様なエラーが出てインストールが出来ませんでした。

xcrun: error: invalid active developer path (/Library/Developer/CommandLineTools), missing xcrun at: /Library/Developer/CommandLineTools/usr/bin/xcrun 

このエラーが出た時の対処法は以下のリンクを参考にしてみてください。

www.main-function.com

nodebrewのバージョンを確認してみます。

$ nodebrew -v
nodebrew 1.0.1

Usage:
    nodebrew help                         Show this message
    nodebrew install <version>            Download and install <version> (from binary)
    nodebrew compile <version>            Download and install <version> (from source)
    nodebrew install-binary <version>     Alias of `install` (For backword compatibility)
    nodebrew uninstall <version>          Uninstall <version>
    nodebrew use <version>                Use <version>
    nodebrew list                         List installed versions
    nodebrew ls                           Alias for `list`
    nodebrew ls-remote                    List remote versions
    nodebrew ls-all                       List remote and installed versions
    nodebrew alias <key> <value>          Set alias
    nodebrew unalias <key>                Remove alias
    nodebrew clean <version> | all        Remove source file
    nodebrew selfupdate                   Update nodebrew
    nodebrew migrate-package <version>    Install global NPM packages contained in <version> to current version
    nodebrew exec <version> -- <command>  Execute <command> using specified <version>

Example:
    # install
    nodebrew install v8.9.4

    # use a specific version number
    nodebrew use v8.9.4

Node.jsのインストール

nodebrewのインストールが完了したので、Node.jsのインストールを行います。
インストール可能なバージョンの確認してみます。

$ nodebrew ls-remote
v0.0.1    v0.0.2    v0.0.3    v0.0.4    v0.0.5    v0.0.6    

v0.1.0    v0.1.1    v0.1.2    v0.1.3    v0.1.4    v0.1.5    v0.1.6    v0.1.7
v0.1.8    v0.1.9    v0.1.10   v0.1.11   v0.1.12   v0.1.13   v0.1.14   v0.1.15
v0.1.16   v0.1.17   v0.1.18   v0.1.19   v0.1.20   v0.1.21   v0.1.22   v0.1.23
v0.1.24   v0.1.25   v0.1.26   v0.1.27   v0.1.28   v0.1.29   v0.1.30   v0.1.31
v0.1.32   v0.1.33   v0.1.90   v0.1.91   v0.1.92   v0.1.93   v0.1.94   v0.1.95
v0.1.96   v0.1.97   v0.1.98   v0.1.99   v0.1.100  v0.1.101  v0.1.102  v0.1.103
v0.1.104  

   :
   :

v10.0.0   v10.1.0   v10.2.0   v10.2.1   v10.3.0   v10.4.0   v10.4.1   v10.5.0
v10.6.0   v10.7.0   v10.8.0   v10.9.0   v10.10.0  v10.11.0  v10.12.0  v10.13.0
v10.14.0  v10.14.1  v10.14.2  

v11.0.0   v11.1.0   v11.2.0   v11.3.0   v11.4.0   

io@v1.0.0 io@v1.0.1 io@v1.0.2 io@v1.0.3 io@v1.0.4 io@v1.1.0 io@v1.2.0 io@v1.3.0
io@v1.4.1 io@v1.4.2 io@v1.4.3 io@v1.5.0 io@v1.5.1 io@v1.6.0 io@v1.6.1 io@v1.6.2
io@v1.6.3 io@v1.6.4 io@v1.7.1 io@v1.8.1 io@v1.8.2 io@v1.8.3 io@v1.8.4 

io@v2.0.0 io@v2.0.1 io@v2.0.2 io@v2.1.0 io@v2.2.0 io@v2.2.1 io@v2.3.0 io@v2.3.1
io@v2.3.2 io@v2.3.3 io@v2.3.4 io@v2.4.0 io@v2.5.0 

io@v3.0.0 io@v3.1.0 io@v3.2.0 io@v3.3.0 io@v3.3.1 

最新バージョンをインストールしてみます。

$ nodebrew install-binary latest
Fetching: https://nodejs.org/dist/v11.4.0/node-v11.4.0-darwin-x64.tar.gz
Warning: Failed to create the file 
Warning: /Users/xxxxx/.nodebrew/src/v11.4.0/node-v11.4.0-darwin-x64.tar.gz: 
Warning: No such file or directory

curl: (23) Failed writing body (0 != 1059)
download failed: https://nodejs.org/dist/v11.4.0/node-v11.4.0-darwin-x64.tar.gz

フォルダがないというエラーが出ているのでフォルダを作成します。

$ mkdir -p ~/.nodebrew/src

もう一度実行してみます。

$ nodebrew install-binary latest
Fetching: https://nodejs.org/dist/v11.4.0/node-v11.4.0-darwin-x64.tar.gz
######################################################################## 100.0%
Installed successfully

インストールが完了しました。

インストールされているバージョンを確認してみます。

$ nodebrew ls
v11.4.0

current: none

カレントが設定されていないので、カレントを切り替えます。

$ nodebrew use v11.4.0
use v11.4.0

Node.jsが使用できるか確認します。
バージョンを確認します。

$ node -v
-bash: node: command not found

パスが通っていない様なので、パスを通します。

$ echo 'export PATH=$HOME/.nodebrew/current/bin:$PATH' >> ~/.bash_profile

ターミナルを再起動します。

Node.jsのバージョンを確認します。

$ node -v
v11.4.0

これでNode.jsのインストールは完了です。

【Mac】「xcrun: error: invalid active developer path」の対処法

先日、Node.jsをセットアップする為にbrewからnodebrewをインストールしようした際に、
以下のようなエラーメッセージが表示されてインストールに失敗しました。

xcrun: error: invalid active developer path (/Library/Developer/CommandLineTools), missing xcrun at: /Library/Developer/CommandLineTools/usr/bin/xcrun

このエラーはMacのOSのアップデートで起こるようで、
macOS High SierraからmacOS Mojaveにアップデートした後に起こるようになりました。

実際にnodebrewをインストールした際のエラーの状況は以下の通りです。

$ brew install nodebrew
Updating Homebrew...
xcrun: error: invalid active developer path (/Library/Developer/CommandLineTools), missing xcrun at: /Library/Developer/CommandLineTools/usr/bin/xcrun
==> Auto-updated Homebrew!
Updated 1 tap (homebrew/core).
==> New Formulae
dnscontrol      i386-elf-gdb    pict            rargs           websocat
goreman         php@7.2         postgresql@10   sng
==> Updated Formulae
git ✔                                    libxmlsec1
abyss                                    lighttpd
activemq                                 lmod
aircrack-ng                              logstash

    :
    :

librsvg                                  xsimd
libswiften                               you-get
libtins                                  youtube-dl
libuv                                    zola
libvirt
==> Renamed Formulae
hh -> hstr
==> Deleted Formulae
apple-gcc42                gradle@2.14                pldebugger
aptly-completion           php@7.0

xcrun: error: invalid active developer path (/Library/Developer/CommandLineTools), missing xcrun at: /Library/Developer/CommandLineTools/usr/bin/xcrun
Error: An exception occurred within a child process:
  CompilerSelectionError: nodebrew cannot be built with any available compilers.
Install GNU's GCC
  brew install gcc

他のアプリケーションでも問題が起きていないか確認してみます。

$ git --version
git version 2.19.1

gitのバージョンを確認したところgitは問題なく動作しているようです。

brew doctorを確認してみます。
すると以下の様なワーニングが出ているようです。

$ brew doctor
Please note that these warnings are just used to help the Homebrew maintainers
with debugging if you file an issue. If everything you use Homebrew for is
working fine: please don't worry or file an issue; just ignore this. Thanks!

Warning: The following directories do not exist:
/usr/local/sbin

You should create these directories and change their ownership to your account.
  sudo mkdir -p /usr/local/sbin
  sudo chown -R $(whoami) /usr/local/sbin

Warning: "config" scripts exist outside your system or Homebrew directories.
`./configure` scripts often look for *-config scripts to determine if
software packages are installed, and what additional flags to use when
compiling and linking.

Having additional scripts in your path can confuse software installed via
Homebrew if the config script overrides a system or Homebrew provided
script of the same name. We found the following "config" scripts:
  /Library/Frameworks/Python.framework/Versions/3.6/bin/python3.6m-config
  /Library/Frameworks/Python.framework/Versions/3.6/bin/python3-config
  /Library/Frameworks/Python.framework/Versions/3.6/bin/python3.6-config

Warning: Your Xcode is configured with an invalid path.
You should change it to the correct path:
  sudo xcode-select -switch /Applications/Xcode.app

Warning: Broken symlinks were found. Remove them with `brew prune`:
  /usr/local/share/man/man3/*

今回のエラーは「CommandLineToolのパスが見つからない」という内容でしたので、
以下のワーニングを解消する必要がありそうです。

Warning: Your Xcode is configured with an invalid path.
You should change it to the correct path:
  sudo xcode-select -switch /Applications/Xcode.app

以下のコマンドを実行します。

$ sudo xcode-select -switch /Applications/Xcode.app

再度、nodebrewのインストールを試してみます。

$ brew install nodebrew
==> Downloading https://github.com/hokaccha/nodebrew/archive/v1.0.1.tar.gz
==> Downloading from https://codeload.github.com/hokaccha/nodebrew/tar.gz/v1.0.1
######################################################################## 100.0%
==> Caveats
You need to manually run setup_dirs to create directories required by nodebrew:
  /usr/local/opt/nodebrew/bin/nodebrew setup_dirs

Add path:
  export PATH=$HOME/.nodebrew/current/bin:$PATH

To use Homebrew's directories rather than ~/.nodebrew add to your profile:
  export NODEBREW_ROOT=/usr/local/var/nodebrew

Bash completion has been installed to:
  /usr/local/etc/bash_completion.d

zsh completions have been installed to:
  /usr/local/share/zsh/site-functions
==> Summary
🍺  /usr/local/Cellar/nodebrew/1.0.1: 8 files, 38.6KB, built in 6 seconds

「xcrun: error: invalid active developer path」が解消できて、
nodebrewがインストールできました。

他のサイトですと以下のコマンドでもCommanLineToolのインストールが行えるとのことです。
上記の方法でうまくいかない場合は試してみてください。

$ xcode-select --install

Unityで機械学習を行う「ML-Agents」を試してみよう!(Mac編)

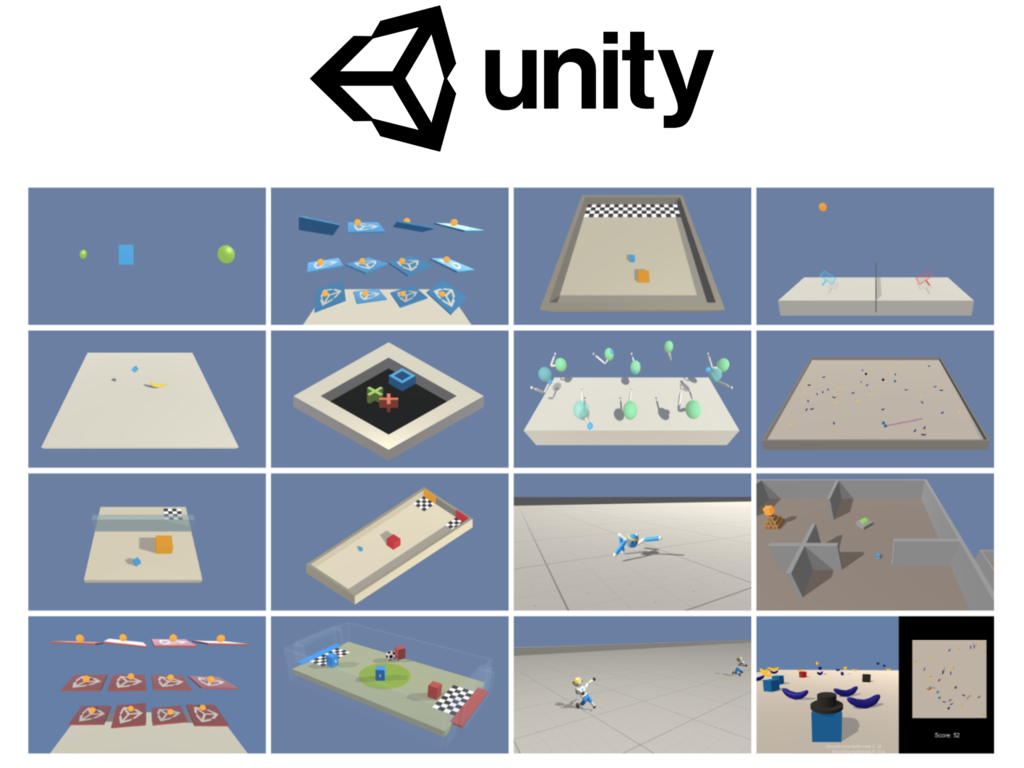
Unityで機械学習を行うためのライブラリが公開されているので試してみました。
サンプルのプロジェクトも収録されているので、
今回はサンプルを実行するところまで紹介します。

f:id:takezoh_1127:20181129193235p:plain

実行環境は以下のバージョンで試してみました。

Unity 2018.2.9f1
ML-Agents v0.5.0

  • Python3.6のインストール
  • pip3のインストール
  • ML-Agentsのダウンロード
  • 必要なライブラリのインストール
  • 学習用の実行環境をビルドする
  • 学習させてみる
  • 学習結果を反映させてみる
続きを読む

【Git】Gitをターミナルのコマンドラインで使ってみる(Mac編)

f:id:takezoh_1127:20181119000259p:plain

Gitをターミナルのコマンドラインで使ってみたいと思います。

Xcodeをインストールしていない、もしくは最新版をインストールしたい場合などはこちらのページを参考にインストールしてみてください。

www.main-function.com

www.main-function.com

  • ローカルPCのみで触ってみる
続きを読む